Introduction
Summer is finally here, and it’s time to tackle the overgrown grass and unruly weeds in your yard. But what happens when your trimmer head malfunctions or gets damaged? Don’t fret! Fixing a trimmer head is an easy and inexpensive task that can be completed in a matter of minutes. In this comprehensive guide, we’ll provide step-by-step instructions on how to identify the problem, gather the necessary tools, and replace or repair your trimmer head, restoring precision to your garden or yard maintenance routine.

Image: www.youtube.com
Understanding Trimmer Heads: Types and Functions
Trimmer heads vary in design and functionality depending on the specific model and purpose. Common types include:
- Bump Feed Trimmer Head: Automatically releases line when the head is tapped against the ground, ensuring a continuous supply of cutting line.
- Fixed Line Trimmer Head: Manually advance the line using a button or lever. Provides greater control over line length and is ideal for delicate trimming.
- Blade Trimmer Head: Uses rotating blades instead of line, offering more durability and cutting power for thicker vegetation.
Identifying Common Trimmer Head Problems
Understanding the symptoms of a malfunctioning trimmer head is essential for efficient troubleshooting. Some common issues include:
- Line not advancing: Obstructions like grass buildup or damage to the spool assembly can prevent the line from feeding properly.
- Uneven cutting: Deformed lines, damaged blades, or imbalances in the head can affect the quality of the cut.
- Excessive vibration: Loose or worn internal components can cause the head to shake excessively, making it difficult to hold and control.
Gathering the Necessary Tools
Before starting any repairs, gather the tools you’ll need:
- Screwdriver (Phillips or flathead, depending on the trimmer model)
- Allen wrench (if required for disassembly)
- New trimmer head or replacement parts (if needed)
- Safety glasses and gloves
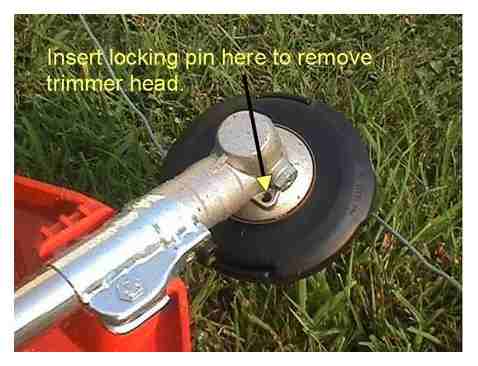
Image: arkheno.com
Step-by-Step Guide to Fixing a Trimmer Head
1. Safety First: Unplug and Inspect
For electric trimmers, always unplug the device before starting any repairs. For gas-powered trimmers, disconnect the spark plug wire. Inspect the area for any obstacles or potential hazards.
2. Remove the Trimmer Head
Identify the method for removing the trimmer head on your model. Usually, it involves unscrewing a bolt or collar using a screwdriver or Allen wrench. Once loosened, the head can be removed by hand.
3. Diagnose the Problem
Examine the trimmer head components. Look for:
- Broken or jammed line: Remove any obstacles and wind a new line onto the spool.
- Deformed lines: Replace the line with a new one and ensure it is wound evenly.
- Worn or bent blades: Check for damaged or missing blades and replace them if necessary.
4. Clean the Trimmer Head and Spool
Use a wire brush or compressed air to remove debris and grass buildup from the trimmer head and spool assembly. This ensures smooth operation.
5. Replace the Trimmer Head or Parts
If necessary, replace the entire trimmer head or individual parts like the spool, line, or blades. Follow the manufacturer’s instructions to assemble and attach the new components.
6. Reinstall the Trimmer Head
Reinstall the trimmer head by screwing it back onto the shaft. Tighten the bolt or collar securely, but avoid overtightening.
7. Test and Inspect
Start the trimmer and test the line feed and cutting efficiency. Inspect the trimmer head for any vibrations or uneven cutting. Adjust the tension or line length if needed.
Expert Insights and Actionable Tips
-
Use the recommended trimmer line: Different models and types of trimmer heads require specific line diameters and shapes. Check your user manual for guidelines.
-
Wind the line correctly: Line wound incorrectly can cause jamming or premature breakage. Refer to the manufacturer’s instructions for the proper winding direction.
-
Sharpen or replace blades regularly: Dull blades impact cutting performance and can lead to uneven cuts and frayed lines.
How To Fix A Trimmer Head
Conclusion
With this comprehensive guide, you now possess the knowledge and confidence to troubleshoot and fix a trimmer head, ensuring optimal performance for your gardening tasks. Regular maintenance and timely repairs will prolong the life of your trimmer and keep your yard looking its best all season long. So, get your hands dirty, embrace the DIY spirit, and enjoy the satisfaction of a well-manicured lawn or garden.
