Painting should be a straightforward task, but nothing ruins a crisp, clean paint job like paint bleed. It’s frustrating to see paint seeping under masking tape, leaving unsightly marks on your finished surface. But fear not! Mastering the art of preventing paint bleed is achievable with a few easy steps.

Image: foxhollowcottage.com
In this guide, we will delve into the causes of paint bleed, unveil expert techniques for eliminating it, and explore common FAQs to help you achieve flawless paint results. Get ready to elevate your painting skills and say goodbye to paint bleed!
Understanding Paint Bleed: The Causes
Paint bleed occurs when liquid paint seeps through the porous surface of masking tape, resulting in unwanted paint marks on unintended areas. Several factors contribute to this problem:
- Thin Tape: Cheap, low-quality tapes can have a low thread count, allowing paint to penetrate easily.
- Improper Application: Not pressing tape firmly into place creates gaps where paint can flow through.
- Old Tape: Aged tape loses its adhesive strength over time, allowing paint to seep under.
- Oil-Based Paints: These paints are thinner and more penetrating than water-based ones.
- Uneven Surfaces: Bumpy or textured surfaces create gaps that give paint an entry point.
Strategies for Preventing Paint Bleed
Now that we understand what causes paint bleed, let’s explore proven techniques to prevent it:
- Choose High-Quality Tape: Invest in high-thread-count masking tape specifically designed for painting.
- Apply Firmly: Press tape down securely, ensuring no gaps between the tape and the surface.
- Use Multiple Layers: Apply two layers of tape at critical edges, allowing one layer to overlap the other.
- Seal the Edges: Use a thin layer of painter’s caulk or petroleum jelly along the edges of the tape to create a barrier against paint.
- Let the Surface Dry: Allow the caulk or petroleum jelly to dry before painting to prevent the tape from peeling.
- Tape Diagonal Joints: For corners and diagonal lines, apply tape at a 45-degree angle for a more secure seal.
Expert Advice: Tips for Flawless Results
Beyond the basic techniques, here are some expert tips for minimizing paint bleed and achieving professional-quality results:
- Use Fresh Tape: Always use new, unopened rolls of masking tape to ensure optimal adhesion.
- Clean the Surface: Remove any dirt, dust, or debris from the surface to prevent the tape from lifting.
- Avoid Touching the Adhesive: Handle the tape from the edges to prevent fingers from transferring oil onto the adhesive.
- Apply In Segments: For long lines, apply tape in shorter segments, overlapping each segment slightly.
- Remove Tape Immediately: Peel off the masking tape as soon as the paint has completely dried to prevent tearing.
By implementing these tips, you will significantly reduce the likelihood of paint bleed and achieve crisp, clean paint lines every time.
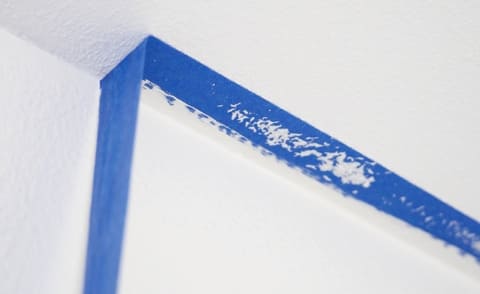
Image: holapaints.com
FAQs: Addressing Common Concerns
- Q: Why does paint bleed under tape even when I use high-quality tape?
A: It could be due to applying the tape without pressing it down firmly or using old or deteriorated tape.
- Q: Can I use painter’s tape for all types of paint?
A: While painter’s tape is suitable for most paints, it’s essential to check the manufacturer’s recommendations for specific paint types.
- Q: How can I prevent paint bleed on rough surfaces?
A: Apply a thin layer of spackling paste or wood filler over the surface before painting to smooth out imperfections.
- Q: What should I do if paint bleeds under the tape?
A: Let the paint dry completely and gently scrape away the excess with a sharp razor blade or use a paint remover.
How To Fix Paint Bleed Under Tape
Conclusion: Embracing Flawless Painting
Preventing paint bleed is a crucial step in achieving a professional-looking paint job. By understanding the causes and implementing the techniques and tips outlined in this guide, you can confidently overcome this common painting challenge. Remember, patience and attention to detail are key to achieving impeccable results. So, grab your brush, choose high-quality tape, and get ready to transform your space with beautifully painted surfaces!
Are you eager to know more about painting techniques or explore other home improvement topics? Let us know in the comments below, and we’ll be happy to provide you with more valuable information.
