Introduction:
Laminate vinyl plank (LVP) flooring has become increasingly popular due to its durability, ease of installation, and affordable price point. However, even the most resilient LVP flooring is susceptible to scratches and wear over time, detracting from its aesthetic appeal. If you’re faced with unsightly scratches on your LVP, despair not! With the right techniques and a touch of patience, you can restore your flooring to its former glory. This comprehensive guide will empower you with step-by-step instructions and expert tips to effectively repair scratched LVP flooring.
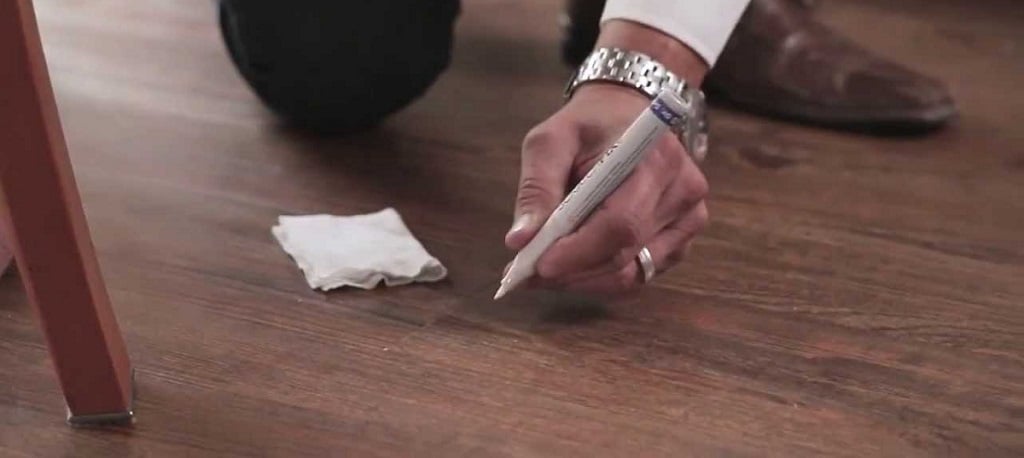
Image: www.accessfloorstore.com
Delving into the Art of LVP Scratch Repair:
Understanding the nature of scratches on LVP flooring is paramount. Scratches often occur due to factors such as furniture movement, pet claws, or accidental drops of heavy objects. It’s crucial to assess the depth and severity of the scratches before commencing repairs. Shallow scratches primarily affect the surface layer of the flooring, while deeper scratches may penetrate through multiple layers.
Tools and Materials for Repair:
To embark on your LVP floor scratch repair journey, gather the necessary tools and materials. These include:
- Soft cloths or microfiber towels
- Mild dish soap mixed with warm water
- Isopropyl alcohol (optional)
- Rubbing compound (for deeper scratches)
- Fine-grit sandpaper (800-1000 grit)
- Matching LVP repair kit or wood filler
- Trowel or putty knife
- Heat gun or hair dryer (for heat-weld repair)
Step-by-Step Guide to Repairing Scratches on LVP Flooring:

Image: www.pinterest.com
1. Cleaning the Scratch:
Before attempting repairs, thoroughly clean the scratched area using a soft cloth or microfiber towel dampened with a mild dish soap solution. Remove any dirt, dust, or debris from the scratch to prepare it for the repair process.
2. Assessing Scratch Severity:
Examine the scratch closely to determine its depth. If the scratch is shallow and confined to the surface layer, proceed with surface touch-up repair methods. For deeper scratches that penetrate multiple layers, you may need to consider more extensive repair options involving sanding and filling.
3. Surface Touch-Up Repair:
For surface scratches, apply a small amount of rubbing compound to the affected area using a soft cloth. Gently rub in a circular motion to remove the scratch. If rubbing compound is unavailable, you can substitute it with isopropyl alcohol. Apply the alcohol sparingly using a cotton swab, taking care not to damage the surrounding flooring.
4. Sanding Deeper Scratches:
In the case of deeper scratches, sanding may be necessary to smooth out irregularities and create a level surface for filling. Use fine-grit sandpaper (800-1000 grit) and gently sand the scratch in the direction of the grain. Avoid excessive sanding, as this can damage the flooring.
5. Filling the Scratch:
Once the scratch has been sanded, fill it using a matching LVP repair kit or wood filler. Apply the filler using a trowel or putty knife, ensuring it completely fills the scratch. Allow the filler to cure according to the manufacturer’s instructions.
6. Smoothing and Blending:
After the filler has cured, smooth the repaired area using fine-grit sandpaper or a sanding sponge. Sand gently until the filled area is flush with the surrounding flooring.
7. Heat-Weld Repair (Optional):
If the scratch extends through multiple layers, a heat-weld repair may be necessary to ensure a strong and durable bond. Use a heat gun or hair dryer to apply heat to the edges of the scratch, melting the material slightly. Press the edges together to fuse them and create a seamless repair.
Expert Tips:
- Always test repair methods on an inconspicuous area first to ensure they do not harm the flooring.
- Use gentle pressure when sanding or applying filler to avoid damaging the LVP.
- If you’re unsure about repairing deep scratches, consult a professional flooring contractor.
- Regular cleaning and maintenance, including sweeping, vacuuming, and occasional mopping, can help prevent scratches and extend the lifespan of your LVP flooring.
How To Fix Scratched Lvp Flooring
Conclusion:
Repairing scratched LVP flooring is a rewarding endeavor that can restore your flooring to its original beauty. By following the step-by-step guide and utilizing the expert tips provided in this article, you can effectively repair scratches and maintain the pristine condition of your LVP flooring. Remember that patience and attention to detail are key to achieving a successful repair. Don’t hesitate to reach out to flooring professionals for guidance if you encounter any challenges along the way. Happy repairing!
